


A Spectacular Dance: A Guide to Exploring the Northern Lights in Minnesota
The Northern Lights, or Aurora Borealis, present one of nature's most captivating displays, characterized by shimmering curtains of vibrant colors dancing across the night sky. For those residing in the northern United States, particularly in states like Minnesota, witnessing this celestial phenomenon is indeed possible.

Photo by Vincent Guth on Unsplash
The Northern Lights, or Aurora Borealis, present one of nature's most captivating displays, characterized by shimmering curtains of vibrant colors dancing across the night sky. For those residing in the northern United States, particularly in states like Minnesota, witnessing this celestial phenomenon is indeed possible.
The Northern Lights occur when charged particles from the sun collide with gasses in the Earth's atmosphere, resulting in a stunning light show. These particles are drawn towards the Earth's magnetic poles, hence why the Northern Lights are typically visible in regions closer to the Arctic Circle.
While the Northern Lights are more commonly observed during the winter months, particularly in areas with clear, dark skies, their appearance is unpredictable. Factors such as solar activity, geomagnetic storms, and weather conditions all play a role in determining visibility.
Minnesota's geographical location, with its proximity to the Arctic Circle and relatively low levels of light pollution in certain areas, makes it an excellent spot for viewing the Northern Lights. The state's northern regions, away from urban centers and artificial light sources, offer optimal conditions for observing this awe-inspiring spectacle.

Photo by Vincent Guth on Unsplash
For those interested in catching a glimpse of the Northern Lights in Minnesota, it's essential to plan accordingly. Monitoring aurora forecasts, choosing nights with clear skies, and heading to remote areas away from city lights are recommended strategies for maximizing visibility.
As someone who has spent time chasing the Lights in northern Michigan, I can personally attest to feeling the awe and wonder of such a large and spectacular event. To bear witness to such natural artistry is truly a one-of-a-kind experience that I would highly recommend to anyone within a viewing radius.
Remember, patience is key when it comes to observing the Northern Lights. While sightings are never guaranteed, the potential to experience this natural marvel firsthand is an adventure worth embarking on. So, bundle up, pack your essentials, and prepare to be captivated by the celestial ballet of the Northern Lights in the skies above Minnesota.
Source: https://www.space.com/15139-northern-lights-auroras-earth-facts-sdcmp.html

The American Chestnut: From Cradle to Grave

Photograph by Chestnut Foundation
Many are familiar with the grandiose sequoias of California, but few are old enough to remember another magnificent tree that once towered over our eastern mountain ranges. Often standing ten stories tall, the American Chestnut was once the glory of the Appalachian forests. Tales of old reminisce of blossom-covered hillsides in July and of wagon loads overflowing with chestnut burs in the autumn. This single species was the life source of many mountain communities; its legacy harbors a melancholy memory of ages past.
The loss of the American Chestnut tree has been quoted as being the greatest ecological disaster to strike the world’s forests in all of history.
At the turn of the twentieth century, the American Chestnut made up 1 of every 4 trees in its native range and covered over 200 million acres of American forests, primarily in the Appalachian mountains. This prolific tree grew quickly in both height and girth, with some records measuring trees that spanned upwards of 10 feet in diameter. In addition to its impressive biomass, the American Chestnut was a primary source of food and fiber for mountain communities. Chestnut blossoms produced decadent honey in the summertime, and its straight-grained, rot-resistant wood was ideal for everything from structures to telephone poles to musical instruments.
The American Chestnut wove itself deeply into Appalachian culture, earning it the colloquial name “cradle to grave tree;” its versatile wood saw a man through his life, from the fibers of his cradle to the lumber in his coffin.
In the autumn, the branches of this marvelous specimen would rain wagons full of chestnuts that provided a cash crop to mountain inhabitants. Many families depended on these trees for survival, using the income to pay bills or purchase basic necessities. Farmers also used chestnuts to feed their hogs, setting them loose into the woods to forage freely. The loss of the American Chestnut resulted in the congruent loss of two major income sources for Appalachian families; for many communities, this occurred at the same time the US was entering the Great Depression.

Image from The American Chestnut Foundation
A fungal pathogen, Cryphonectria parasitica, was the responsible party for this catastrophic blight. Its accidental introduction came through blight-resistant chestnut species imported from Asia. The spores travelled quickly downwind from its origin in New York, averaging 25 miles each year. By the time it was identified, efforts to stop it proved futile. In less than half a century, 99.99% of American Chestnut trees were dead or dying. What was once a towering giant in North American forests is now for all intents and purposes functionally extinct. Chestnut blight remains problematic to this day, festering in alternative hosts and choking the life from American Chestnut saplings before they ever grow old enough to bear fruit.
For many of us, this story may feel irrelevant to our daily lives. What does it matter that one tree species has disappeared?
Our ecosystem is an interdependent network of biotic and abiotic factors whose harmonious dance makes up the world we know. The qualities that each species possesses uniquely caters to the diet, habitat, and flourishment of other niche individuals. The chestnut blight, for example, gave oak species a competitive advantage in Appalachian forests. As a result, forest canopies became denser, favoring understory species that could survive in its shade. Today, this decreased biodiversity has contributed towards making forests vulnerable to more extreme changes. Invasive gypsy moth, for example, favors oak species and threatens forest composition once again. Each time a keystone species is impaired, the entire ecosystem is impacted; populations of other biota and soil composition are affected, resulting in changing microclimates. Additionally, the services that forests provide human beings affect us culturally and economically.
The loss of the American Chestnut is a sobering reminder of why our efforts to preserve native species and control invasive ones is so important; regardless of its size or grandeur, no specimen is exempt from harm. This includes humans.
Presently, one-third of tree species are threatened with extinction. Our trees and forests provide habitat for more than half of other terrestrial plant and animal species. Additionally, our forests sequester carbon, stabilize soil against erosion, improve land fertility, provision freshwater, and are a primary source of food security for much of the planet. Forests also have cultural and spiritual value, providing recreation, beauty, and solace in a busy world. Our ecosystem functions best with diversity; each species that is lost makes its counterparts more vulnerable to similar fates.
To some degree, change is natural and inevitable. The ecosystem, including humans, has learned to adapt to change for millennia. However, as observed by the tale of the American Chestnut, rapid and extreme changes can have severe consequences. May its legacy be our reminder and inspiration to protect and maintain our native habitats.

Grow Your Own Salad Greens…Hydroponically!
As the cost of food steadily increases, it can be challenging to find a way to maintain a vibrant, healthy diet on a budget. With summer around the corner, many people are turning to their backyard gardens to offset the price of produce by growing it themselves. Gardening can be a rewarding and enjoyable hobby, with physical and mental benefits alike, but the reality is that it is not accessible for everyone. Lack of time, space, money, or desire to maintain a garden inhibits many people from reaping the benefits of home-grown produce. However, there may be a solution…
What if I told you there was a way to have fresh salad greens throughout the summer with minimal space, cost, and effort?
Let me introduce you to the Hydroponic Salad Table.

Hydroponics is the method of growing plants in a water solution rather than soil. The essential components of soil that support plant growth can be supplemented through a simple, albeit strategic, design that will leave you inspired and amazed by the wonder of plant physiology.
Two summers ago I tried this model for the first time, and I will never go back! This method of growing salad greens is dirt-free, weed-free, and aside from the initial set-up is maintenance-free as well. All of the supplies I purchased during my first year have lasted me through three growing seasons (and counting), making this a cost-effective way to put produce on the dinner table.
***The Hydroponic Salad Table design in this blog post comes directly from Tom Michaels at the University of Minnesota and is shared with permission. For more details about his design trials and a full manual with instructions on how to start your own Hydroponic Salad Table, visit his website HERE.***
How to Get Started
One hydroponic table will hold up to 12 plants and during peak production should produce enough for a person to have a small salad every day. For a household that loves to consume greens, you might consider building several Salad Tables.
Materials

One 10-gallon plastic storage container, approximately 24” x 15” x 9”
Opaque containers, such as this one, are ideal
A 1.5” thick piece of rigid foam to fit atop your 24” x 15” container
8-12, 2” netpots
A small bag of organic perlite
Hydroponic nutrient solution
See page 9 of Tom’s Manual for hydroponic nutrient suggestions
Seeds
A drill or sharp knife for cutting the foam board
Most of these materials can be purchased at your local hardware or garden supply store. While there is an upfront cost investment for building a Hydroponic Salad Table, materials can be cleaned and reused year after year. Cost can also be reduced by splitting materials that come in larger quantities with a friend or neighbor!
Seed Suggestions
Some salad greens grow better in hydroponics than others. Choosing a variety of seeds will make your salad table more colorful, and will act as a sort of “insurance” in the case that one variety doesn’t thrive. Below are some suggestions for greens to consider:

Lettuces like leaf, Bibb, and romaine
Pac Choi
Kale
Collard Greens
Arugula
Mustard Greens
Cress
Nasturtium
Swiss Chard
Leafy Amaranth
Basil
Sorrel
Spinach does not grow well in this hydroponic system.
Starting Your Hydroponic Salad Table
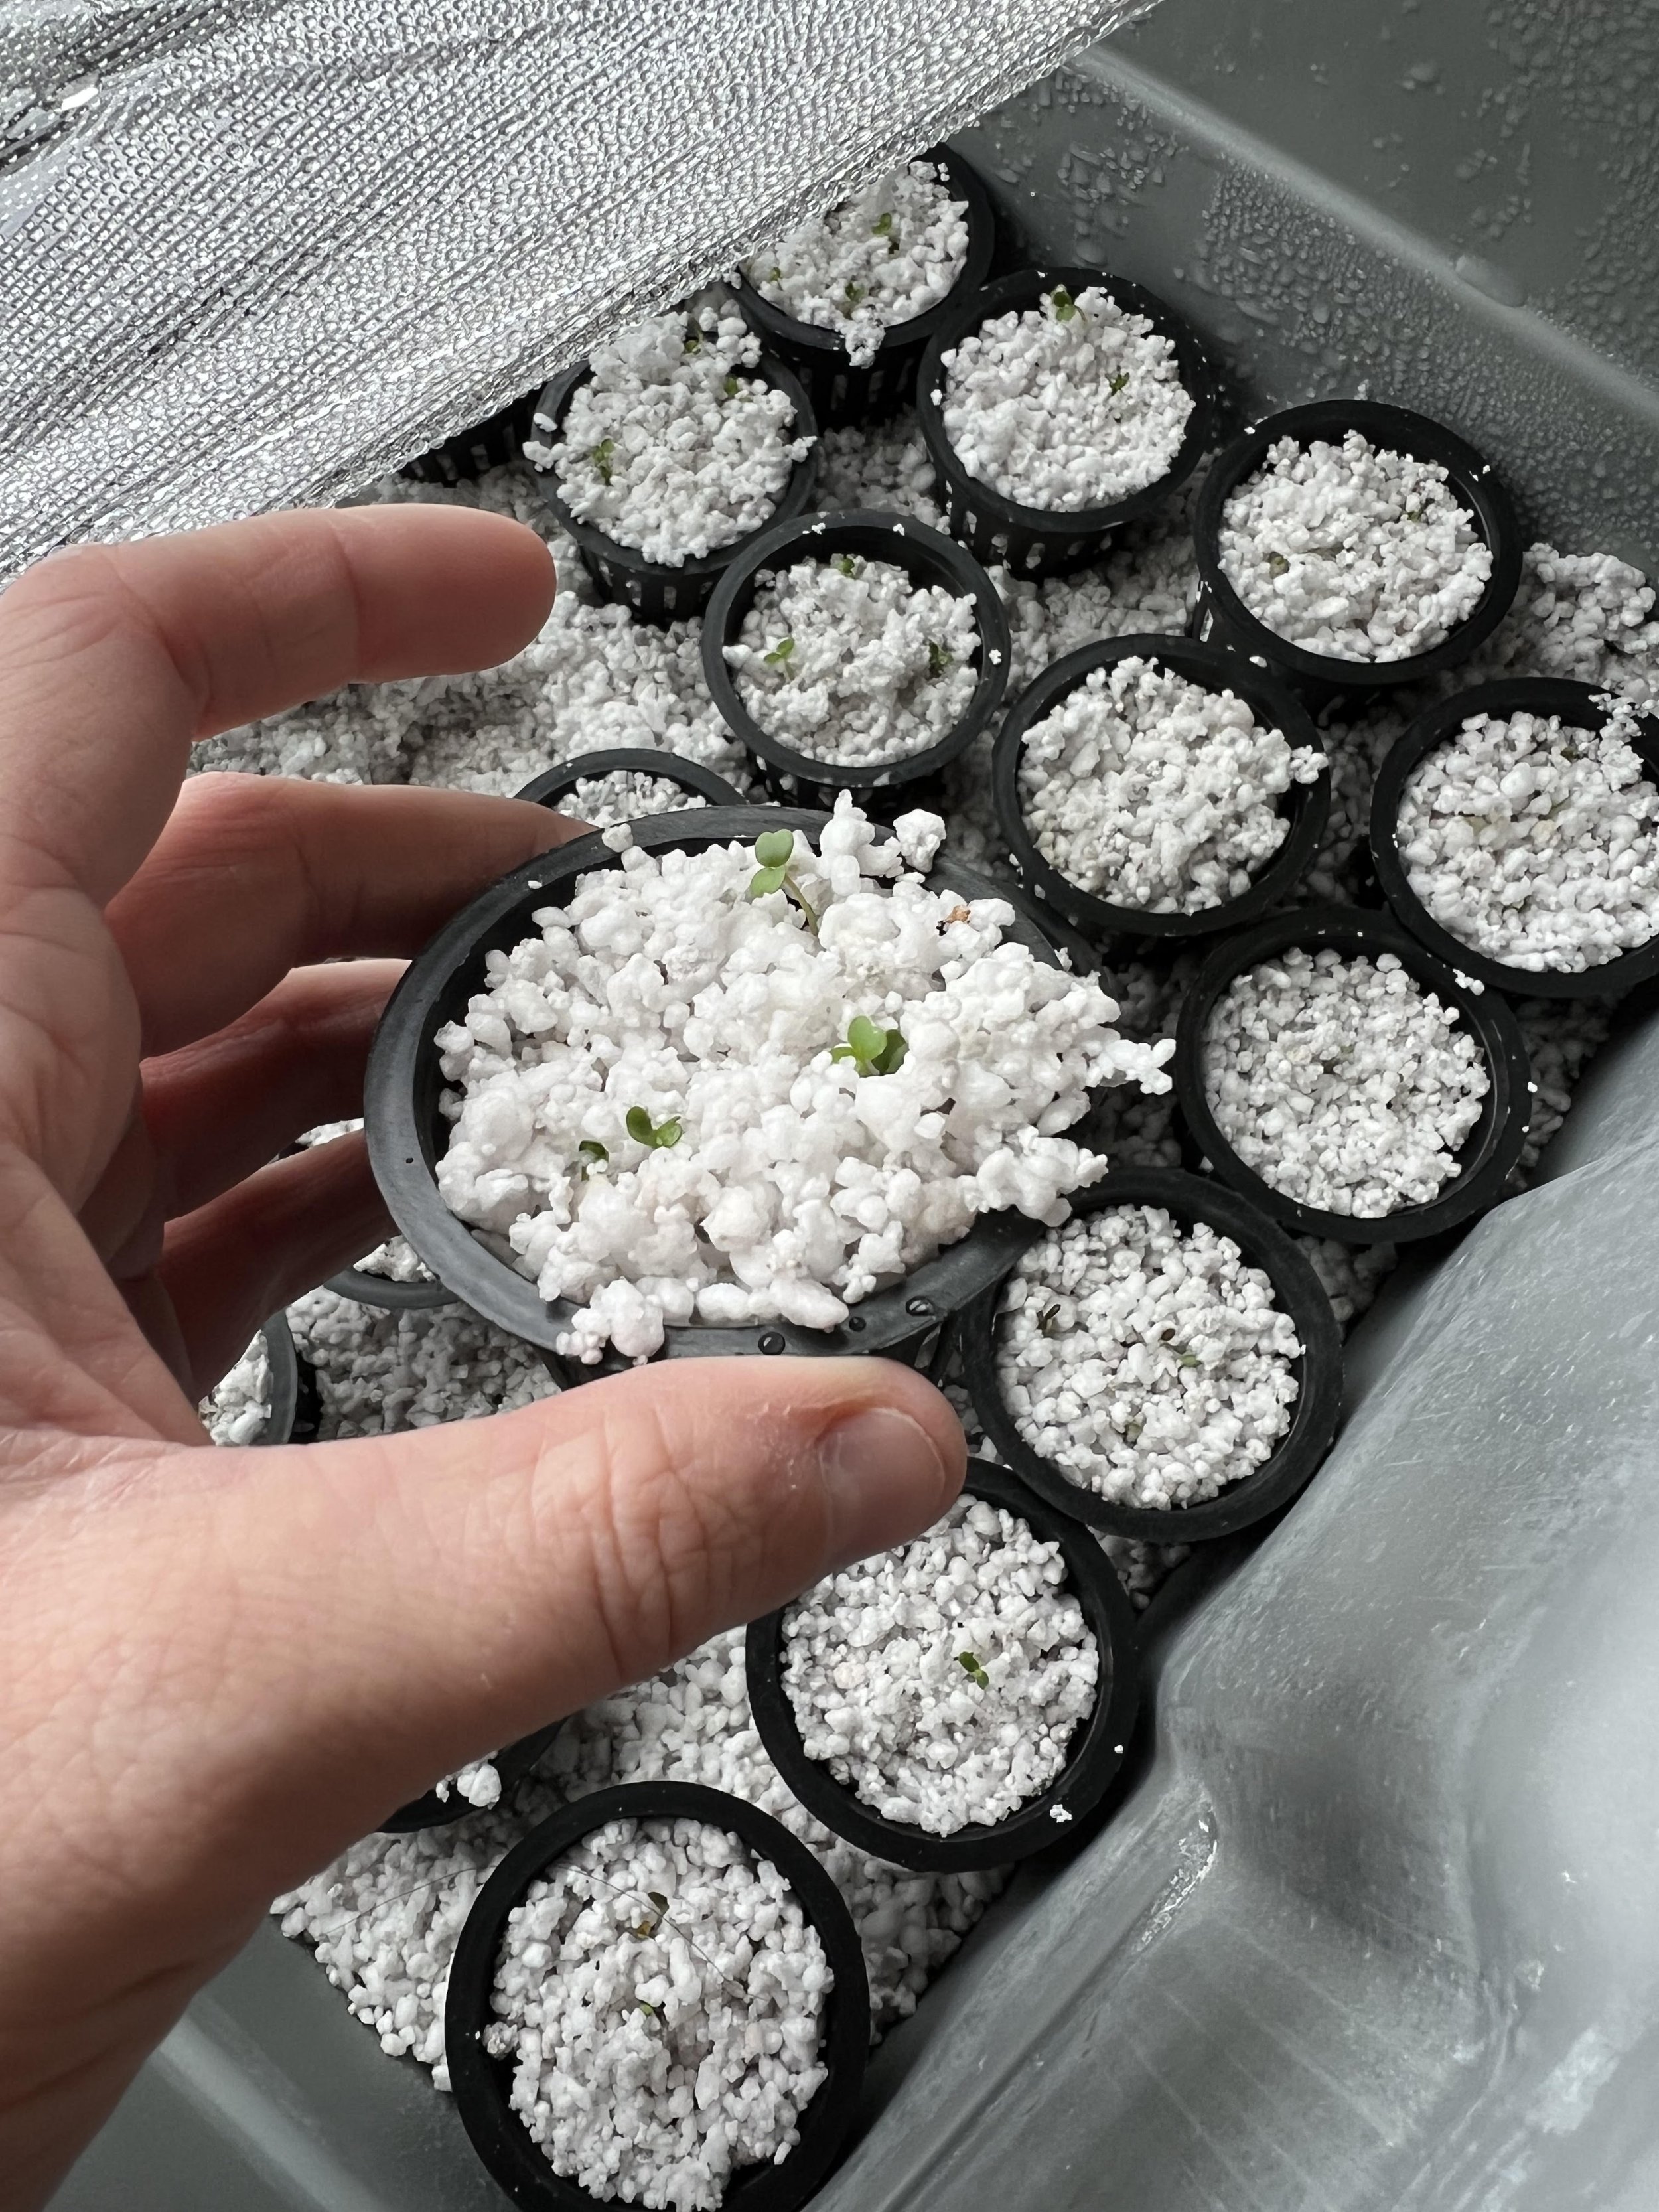
After assembling your materials, you will want to begin by planting your seeds indoors. Fill your 2” net pots with moistened perlite and use the blunt end of a pencil to make 3-5 shallow (¼”) holes in your pot. Drop a seed of one variety into each hole and lightly cover it with perlite. Don’t forget to mark your pot with what you planted!
Fill a flat-bottomed tray (you can use your tote) with about 1” - 1.5” of perlite. Add enough water to the tray until it is about ¼ to ½” below the surface of the perlite. This is going to be a capillary bed for your seedlings.
Twist your seeded net pots into the capillary bed so that the perlite within the net pot makes contact with the water. The pots do not need to be buried more than 1” deep, just enough for moisture to be wicked up.
Cover your tray loosely with clear plastic (cling wrap works fine) and place it in indirect sunlight. The seeds should start to germinate in 3-5 days. When they do, remove the plastic.
About a week after germination, thin your seedlings so that only one plant remains in each pot. The exception to this is cress and Swiss chard; in these cases, leave two plants in each pot.
Gradually begin to introduce the seedlings to the outdoors over several days, a few hours at a time. This will “harden off” your plants and make them more resilient in the outdoor weather. After two weeks, transfer your net pots from their capillary bed into the hydroponic table.

Seedlings 10 Days after planting…time to thin!
Assembling & Using Your Hydroponic Table
While your seeds are germinating in their capillary bed you can start to assemble your hydroponic table. Measure your foam sheet to fit over the opening of your tote, keeping in mind that the tote may bulge slightly when filled with water. Cut 8 to 12 evenly spaced 2” circles into the foam, just large enough for your net pots to slide in without falling through. This is most easily done using a hand drill with a 2” hole saw bit, but it can also be done with a serrated knife.
When you are ready to move your seedlings into the hydroponic table, fill the tote about ¾ full with water and add your hydroponic nutrient solution according to the ratio in the instructions. At this point you may consider testing the pH of the water. See page 11 of Tom’s Manual for more information. Once the nutrient solution is mixed in, fill the tote with water up to the rim. Make sure your tote is placed where you want it to stay, as it will be very heavy! Place your foam board on top of the tote and insert your seedlings into the holes. The water should touch the bottom of the net pots.
Very little maintenance is required after this step. The water level in the tote will decrease over time, but as long as the plant roots are able to reach the water they will be okay. Once the water level is below 3” you can add more nutrient and water to fill the tote to about halfway. Placing rocks or another heavy object on the foam lid may be necessary early on to keep it from blowing in the wind.
Harvest

You can begin harvesting your lettuce about 4 weeks after sowing your seeds. When harvesting, always leave a few leaves on the plant so it can continue to grow and produce more. Your salad table will start to produce the most during the fifth or sixth week and will continue to provide leafy greens until the plants are ten to twelve weeks old. Salad greens generally prefer cooler weather, so you may find that in the peak of summer, your greens become increasingly tough and bitter. The best time to start a hydroponic salad table in Minnesota is early May and early August to avoid the heat of summer.
Diving into this project may seem new and overwhelming at first, but it really is so simple! This is a great opportunity to make salad greens more available in your home throughout the summer and is a fun science experiment for adults and children alike. If you find some extra time on your hands this weekend, give it a go, and keep us updated about your Salad Table progress!

Choose Your Own Adventure: Waste Management
Reduce, Reuse, Recycle, Compost, Incinerate (Energy), Landfill, Incinerate.

This is the culmination of civilization’s experience and intellect regarding waste management. Entire industries and livelihoods have been built around waste management, which is one of the most fundamental problems of human existence. Clay sewage pipes from 4000 BCE, discovered in Mesopotamia, the “cradle of civilization,” shows humans attempting to manage waste. Today, places like New York City have entire departments dedicated to sanitation. For most people, however, the time and thought put into waste management only goes as far as “Something about Reduce, reuse, recycle…?” or “Ugh, garbage day tomorrow. Time to take out the trash.”
So, let’s break it down. What does “Reduce, Reuse, Recycle, Compost, Incinerate (Energy), Landfill, and Incinerate” actually mean? These terms are listed from the most important, impactful, and effective methods of waste management to the last ditch effort. Reducing, therefore, is the most impactful way to help decrease waste, and I am always surprised by the many little ways this can be accomplished.
Reduce means “Get smaller or less.”
Instead of purchasing multiple containers of applesauce or yogurt held together with even more packaging, buy one big container. Likewise, instead of buying a box with a bag of cereal inside, purchase cereal packaged in just a bag. Rather than choosing to buy a box of hot chocolate envelopes, buy one large container of hot chocolate. Individually wrapped products are the enemy of reducing waste. Conscious decision-making about what you want or need will not only limit waste but will also typically comes with cost savings!
Reuse
Product reuse has become a little more mainstream lately. Reuse includes practices such as bringing your own bag to the grocery store, using a water bottle instead of buying a disposable one, and using Tupperware instead of single-use sandwich bags. Some grocery stores promote Reducing and Reusing by allowing customers to provide their own containers to fill with the product at the store. This practice reduces packaging waste by reusing your containers.
Recycle

Minneapolis recycling facility
Recycling, in my opinion, is the poster child for waste management. Everyone seems to know something about recycling, which determines whether they love it or are cynical about it. Sadly, it’s easy to be suspicious. For one, it’s surprisingly difficult to determine what resources are available to you. The sticker on my recycling can is long been worn away by the elements. The best you can do is look up your recycling company’s website and see what they will take for you.
Reducing, Reusing, and Recycling provide massive benefits toward limiting the amount of carbon and waste generated in product mining, transporting, processing, and packaging all before an item even reaches your shopping cart. Recycling an aluminum can, for example, produces up to 90% less carbon and waste than creating a new can from raw materials. Unfortunately, some companies refuse to use recycled materials, which can make it feel like our efforts are wasted. But it has been shown that continued pressure from the consumer is slowly turning the tide. We have the power!
Compost
The next process in line is a fun topic. There is something incredibly satisfying about watching your moldy bread and fuzzy orange peels magically turn into beautiful, rich, aromatic soil (albeit with the forgotten fruit stickers mixed in). The cities in the Minneapolis metro have also seen how compost has become a boon to our organic waste management and our gardens. As a result, there is less rotting compost in our landfills, which frees up space, reduces methane, and limits rodent populations, which are public enemy #1 in societies like New York City. In spite of these benefits, composting is placed fourth on the list because it still requires materials to be mined or processed to replace those used. Nevertheless, it is a far more preferable alternative to the following methods.

Debris crane in action
Incineration (Energy)
“Incineration (Energy)” refers to the process when waste is burned to produce electricity. The products thrown away by consumers must be entirely replaced by raw materials, a process that results in more waste, but at least some benefit is incurred from the incineration process. Energy incineration is typically only performed in extensive metropolitan areas, as storing, moving, and drying the waste can be intensive. I had the privilege of touring Minneapolis’s incinerator and watching the debris crane at work.
Landfill
“Landfill” is exactly what it sounds like. Some dumps are better than others. For example, some create turbulence in their waste to break debris down faster. However, all landfills need to have a way to capture and hold contaminated water or “leachate” that this garbage and the elements create and keep it from sinking into our groundwater. Leachate systems can be a serious environmental concern when they are not functioning properly.
Incinerate
Finally, incineration refers to the burning of waste. In this case, no energy is captured. Although this may sound better than a landfill as it would save space and avoid leachate, burning trash creates other environmental issues. Contaminants and toxic chemicals, including sulfur dioxide, polycyclic organic matter, and heavy metals like dioxin can be introduced into the air. These contaminants are usually captured when the garbage is incinerated for energy, but not in non-energy-producing facilities.
I have barely scratched the surface of waste management with this post. Each of these categories could become its own 40+ hour class. Waste management is fascinating, and I highly encourage taking tours of your waste facilities, recycling plants, and compost sites if accessible in your area. In the meantime, remember your reusable grocery bags, don’t flush your “flushable” wipes, use fewer straws and napkins at restaurants, and take comfort in the small victories.

Evergreen
Each season colors my imagination with its own palette. Spring brings to remembrance pastel hues, as root bulbs debut purple and yellow clusters of hyacinth and daffodils; summer paints my memory with the vibrant greens and blues of manicured lawns and crystal lakes; autumn is illustrated with blazing oranges and reds as the forests prepare for dormancy; and winter…winter is a blanket of pure, clean white that glitters in the brumal sunlight. I don’t associate winter with many other colors; the trees are bare, the sky is clouded, and gardens lie fallow beneath a thick layer of snow. But there is one other color that I find myself gravitating toward in the midwinter months: The color of the evergreens.
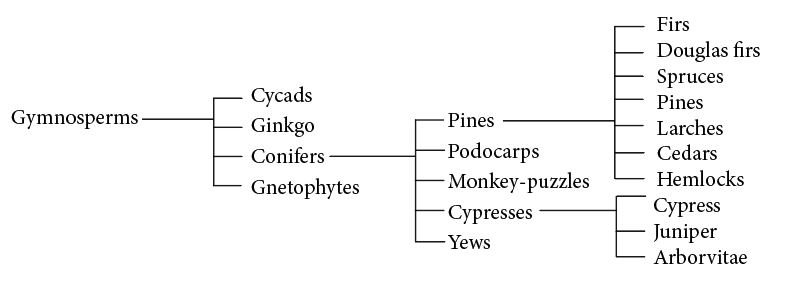
Many native Minnesota evergreens belong to the Pine and Cypress genera within the conifer phylum. This is not an exhaustive list.
Within the conifer phylum are five plant families whose members are largely evergreen. One of these families is the Pinaceae (Pine) family, which encompasses many Minnesota native genera such as spruce, fir, hemlock, and pine. Unlike many of their deciduous counterparts, Pinaceae are characterized by their cones and viridescent needles. Growing up, all needle-laden trees were simply “pine trees” in my adolescent vernacular. However, an observant walk through the forest will surely demonstrate how versatile and distinguished each member of the Pinaceae family truly is.

Image: Picea glauca – White spruce
Take spruce, for example; when you pluck a needle from its branch and roll it between your fingers, it feels square. Spruce needles are sharp and possess a small supportive structure called a “sterigma” that grows between the needle and the branch; when the needle is detached from the tree, the sterigma remains joined with the needle and leaves behind a bumpy texture on the remaining twig.

Image: Abies concolor – White fir
A fir needle, on the other hand, will feel flat between your fingers. Fir needles have blunt tips and do not contain sterigmata. Instead, if you pull a fir needle off its branch, the base looks like a tiny suction cup, and the surface of the branch will remain smooth. Larch needles are likewise flat with dull tips, however, they are deciduous and will lose their needles in the winter.

Image: Pinus resinosa - Red pine
Another diagnostic feature that distinguishes Pinaceae members from one another is how the needles are arranged on the branch. As noted above, fir and spruce needles are individually attached to the branch on which they grow. However, [true] pine needles are attached to the branch in small clusters called fascicles, and Larch species can be uniquely identified by their needly tufts.
Cones are yet another key diagnostic tool used to identify coniferous species. Cones come in many shapes, sizes, and arrangements. Fir and cedar cones sit upright on the branch, while spruce cones hang below it. Spruce cones are soft and flexible, while pine cones are hard and woody. Although Douglas fir is not native to Minnesota, it is commonly grown here on Christmas tree farms; its cones have long, three-pronged bracts that are sometimes compared to mouse tails.

Pseudotsuga menziesii - Douglas fir
In addition to needles and cones, tree shape, branch density, bark, and even odor can be used to distinguish one evergreen from another. Cupressaceae (Cypress) is another coniferous family that contains evergreens, such as juniper; oftentimes juniper, including Eastern red cedar, are readily identified by their reddish, shaggy bark. Many evergreens are aromatic when crushed, and some even have berries.

Juniperus scopulorum - Rocky mountain juniper
The shaggy red bark, scale-like needles and cedar-y aroma are characteristic of many junipers
While the winter may feel long and the landscape desolate, evergreens offer a burst of color and life to contrast the idle snow. The next time you go for a walk, take notice of the coniferous trees. Pluck the needles from their branch; roll them between your fingers; pull them to your face and smell their fragrant perfumes. No two “pine trees” are alike; each expresses a unique imprint on the earth from which they grow…evergreen.
Glaciers
What comes to mind when you think of a glacier? If “constant movement” was your answer, then you’re spot on. While glaciers may appear as solid, formidable sentinels of the mountains, they are actually in constant motion.
Bomber Glacier in Alaska, named for wreckage on the glacier from a plane that crashed in 1957.
Various features form the basic anatomy of a glacier. The point of a glacier which is farthest from the origin is known as the terminus or toe. Surrounding a glacier are moraines, which are areas of rock and debris (or “glacial till”) that are deposited around a glacier as it retreats. Lateral moraines are located at the sides of a glacier, while terminal moraines are located at the toe. Some glacial features can be hazardous to human travel. Crevasses are V-shaped cracks that form with the movement of brittle ice. Vertical shafts called moulins can form in a glacier as meltwater from the surface flows deep within the glacier. When traveling on glaciers you’ll want to be on the lookout for these features, as they can be very deep.
Glaciers form gradually when snow accumulates in an area faster than the rate of summer snowmelt. The weight of this collected snow puts pressure on the accumulated snowpack, transforming it into ice. When the buildup of snow and ice becomes very thick, the force of gravity carries the mass downslope. Ice at the bottom of a glacier tends to move more slowly than ice at the top because it experiences greater frictional forces. During surges, these rivers of flowing ice can move multiple meters per day, which is pretty fast for a gigantic mass of material.

Castner Glacier in Alaska. You can see lateral moraines along the sides of the glacier, where material has been deposited.
It may feel like we are far from glacial features here in Minnesota, but that is not the case. Glaciers existed here just 10,000 years ago, which is really not very long in geologic time. The geology of Minnesota has been influenced by multiple periods of glaciation, as ice sheets expanded and retreated with changes in climate. We have glaciers to thank for our abundance of lakes, which formed as the land was carved by glacial forces.
Today, many of the world’s glaciers are retreating rapidly in response to a warming climate. If you’d like to learn more about these impressive features, the U.S. Geological Survey Benchmark Glacier Project has studied glaciers in the field for decades. You can also learn more about glacial features by wandering into your own backyard; if you’re lucky, you may find evidence of a glaciated past.

The author’s partner heading up Penny Royal Glacier in Alaska.
Scientific or Latin, Which is Your Pick
At Rock Leaf Water, we care for trees, count trees, and marvel at trees. Recently our teams have been performing PBIs (Plot Based Inventory) throughout Minnesota for the DNR and often use common names and Scientific names for describing trees. While inventorying a set of trees last week, a conversation started about Scientific names and improper term Latin names. As I grew up, I had teachers, classmates, and now even professionals use the terms "Scientific names" and "Latin names" interchangeably. In college, I took Latin to meet my language requirement. I quickly learned that Latin names are different from Scientific ones. I prefer the term "Scientific name," as many of my friends know. However, the terms are not interchangeable, and the term Scientific name is correct. Below I will detail the differences between the terms: Scientific names, Latin names, and common names.
First, let's take a quick look at the difference between Scientific names and common names. Common names are what people use commonly in their day-to-day lives. Some examples of common names are red pine, Norway pine, red maple, and tulip poplar. You may have noticed a problem with common names from the examples. Red pine and Norway pine are the same species of tree, Pinus resinosa, which, coincidentally, is the state tree of Minnesota. Common names are often easy to remember, but there is no universal common name across languages or even within the same language, as we can see with the terms red pine and Norway pine.
Next are the scientific names and the reasoning behind them. The scientific community agrees upon scientific names for each species. They all come in two words; the first word is the genus, and the second is the specific epithet. Let's look at the scientific names of the same species as the common names from the example above. Red pine and Norway pine are Pinus resinosa, red maple is Acer rubrum, and tulip poplar is Liriodendron tulipifera. Unlike common names, scientific names only have one name for each species. Scientific names benefit from being the same over all languages and reduce the confusion about which species is being discussed. It also provides information on which genus the particular plant belongs in. However, scientific names are harder to remember and not very well known outside the scientific community.

So you may wonder where the term "Latin names" comes from. Most scientific names are decided by the first scientist that finds a new species. A few scientists in the 1700s named many of the common species today; the most well-known is Carl Linnaeus. Most Western European scientific papers were written in Latin during this time. Due to that reason, many species were Latin-based names. Such as Acer rubrum (red maple). Acer and rubrum both come from Latin and translate directly to the words maple red.
Many people think that all scientific names translate just as easily and come from Latin origin, but they do not. Linnaeus and many of his contemporaries used Latin, people's names, and anything else that sounded good to them. In eastern Europe, around the same time as Linnaeus, many scientists used Greek instead of Latin. So that brings us to our last tree, the tulip poplar I mentioned. The origin of this tree's Scientific name, Liriodendron tulipifera, is Greek. My Greek is not as good as my Latin, but Liriodendron tulipifera translates something to the effect of Lily tree, which is quite fitting due to the tree's flowers.
Let’s finish the debate. Are scientific names the same as Latin names? I argue not. While Latin was a common language for writing scientific papers back in the 1700s, so was Greek. While many scientific names have Latin base words, many of them are Greek, someone's name, or just made up. (For an interesting example of a made-up Scientific name, look up Mini mum, Mini scule, and Mini ature. You won't be disappointed.) Most names that Romans would use for species would be different from the scientific names, and Latin speakers would not recognize most scientific names. Due to these facts, calling scientific names Latin names is the same as calling them Greek names, or for that matter English names. (Now that English is the most common language used to publish scientific findings.) I won't be mad at you if you use the term Latin name, but you can expect a long-winded history lesson.

Liriodendron tulipifera
Tulip Tree

SNOW

Here in Minnesota, we spend a lot of time thinking about snow during this time of the year. At Rock Leaf, snow has a huge impact on our daily planning: when is the snow getting here, how much of it will fall, how will it impact our travel/work, and how good will the skiing be? If snow has also been impacting your plans lately, you may have wondered how and why this stuff forms.
Snow forms in the lower portion of Earth’s atmosphere. This happens when moisture is present and when the temperature is below freezing (32°F). Since warmer air is able to hold more moisture, heavy snows usually occur when ground temperatures are between 15°F and 32°F. During Rock Leaf’s recent Plot Based Inventory (PBI) trip to central Minnesota, we had a few very cold but snow-free days. The low temperatures (around -15°F) and low air moisture content created the crisp, sunny conditions you see in the photo below. So, if the conditions are right, frigid temperatures can make for beautiful days!

Snowflakes form as ice crystals within clouds stick together, and the structure of these ice crystals is influenced by the moisture and temperature conditions they are formed in (see Snow Crystal Diagram). You may have heard that no two snowflakes are exactly the same. While snowflakes may form in similar shapes, their shape changes in response to fluctuations in temperature and moisture as they fall through the air. The likelihood of two snowflakes experiencing identical conditions as they journey from a cloud to the ground is very low, but it isn’t impossible. If you want to take a look at the shape of falling snow, a great way to do this is to catch some snowflakes on a dark surface (e.g., a jacket sleeve, hat, or glove). A hand lens or magnifying glass can help if the crystals are very small.

Snow Crystal Morphology Diagram. Credit: Kenneth G. Libbrecht, http://www.snowcrystals.com/
The excitement doesn’t end once the snow has fallen. Changes to snow crystals can happen once they’ve reached the ground surface. Snow can melt and refreeze to form layers of ice within the snowpack. Layers of snow can be compressed by the weight of additional snowfall, and heavy winds can break down snow crystals and pack them tightly together. Between the layers of snowpack and the ground surface are small spaces known as subnivean (Latin for “under” and “snow”) zones. Small mammals like mice and voles use these spaces to avoid predators and to keep warm. Air temperatures in the subnivean zone are kept stable because the snowpack contains so much trapped air. Snow is actually an excellent insulator.
So when you’re trudging through the snow this winter, know that there are many factors that created the specific conditions of the stuff crunching under your boots. If you want to learn more about snow, the National Snow and Ice Data Center is a great resource for snow info and data: https://nsidc.org/learn/parts-cryosphere/snow.


Healthy Habits
Create habits instead of making resolutions.

Winter has come a bit early for Rock Leaf Water. We are busily finishing projects meant for kinder and gentler weather. However, we are a strong team and strive for excellence despite the environment. Speaking of the environment, when I look out of my office window, I notice that every year the trees have the same processes; they know what to do and when to do it. They take a break in the winter, just a little rest. It prompted me to think about biorhythms, cycles, and habits. The trees have it easy, people do not. I do not embrace New Year Resolutions, I do embrace cycles, biorhythms, and good habits to make our professional and personal lives better. Habits stick around, while resolutions do not. Some habits I subscribe to help me be the best I can be are:
preparing for the week ahead with clear
ideas of major tasks I need to finish
any pre-planning I can do well ahead of schedule
taking time to organize my office and computer each week
taking breaks from screens
clear communication within our team
trying to create a good balance of work to ensure details are not rushed
always remembering to thank people for their hard work

I am continuing to grow and look for ways to improve myself, which in turn will spill over into my professional life. I would love to continue this conversation, and please email me with any comments or tips you find helpful. Email Sarah!


Deciduous Trees
Deciduous Trees

Or, if you're like my partner, the trees with the big leaves. These include oaks, elms, cherries, maples, aspen, birch, and many others here in Minnesota. The fall is when many of these trees create a striking display with their vibrant colors and falling, crunchy leaves.
Deciduous trees tend to lose their leaves during the winter months. The lack of sunlight and water drives the tree to grow a layer of cells at the base of the leaf. This layer is called the "abscission layer." It stops the flow of nutrients and water into the leaf, which causes the leaf to change color, dry out, and eventually fall off the tree. Many reasons have been theorized for discarding leaves. First, the leaves cost more energy than they would be able to make in the winter, thanks again to the lack of liquid water and sunlight. The dry winter air causes desiccation, and anyone living in Minnesota with a drawer full of half-used chapsticks can agree. There is also less surface area for heavy snow to land on, and therefore less stress on the branches. Finally, the nutrients in the leaves typically fall close by and can be reabsorbed by the tree roots once spring warms the ground.
However, the observant may notice that some trees, like oaks, keep their leaves through the winter. The abscission layer on these trees does not completely form until spring, allowing the leaves to remain on the branches. This process is called "marcescence." There is no consensus on why, but the most common thought is that this may protect the tree from deer browse. Deer love oak and will start to eat the tree buds as winter scarcity increases. Another idea comes from Oak trees thriving with common, low-intensity fires, which decreases competition. Oaks may hold their leaves to create potential spring fire starters. Whatever the reason, marcescence is convenient for helping to identify these trees in the winter.